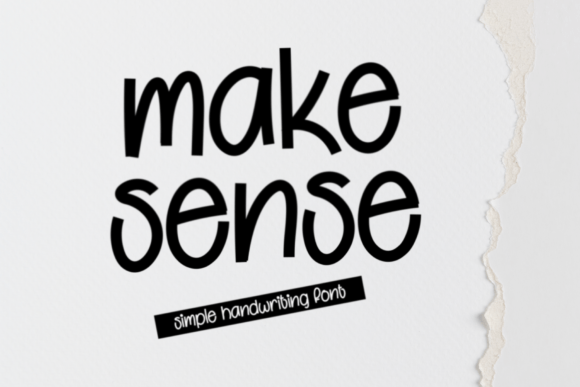
Make Sense
Make Sense is a gorgeous handwritten font designed to bring warmth, personality, and intentionality to visual communication. It’s not just decorative—it’s functional typography with emotional resonance. Its playful yet legible letterforms—slightly uneven baselines, gentle swashes, and expressive joins—create an immediate sense of authenticity. That’s why designers, marketers, educators, and small business owners reach for Make Sense when they need text that feels human, approachable, and memorable—not algorithmically polished, but thoughtfully crafted.
Where Make Sense Fits in Your Creative Process
Typography choices rarely happen in isolation. They’re part of a sequence: research → concept → sketch → type selection → layout → refinement → delivery. Make Sense typically enters at the concept or sketch stage—but its impact extends far beyond that moment. When you’re defining brand voice, for example, pairing Make Sense with a clean sans-serif (like Inter or Poppins) creates instant contrast between warmth and clarity. That pairing signals both friendliness and professionalism—a balance many service-based businesses and educators rely on.
It also works well during execution, especially when speed matters. Unlike highly customized script fonts requiring extensive kerning adjustments, Make Sense ships with OpenType features like contextual alternates and ligatures that activate automatically in modern design tools (Figma, Adobe Illustrator, Affinity Designer). You get variation without manual intervention—saving time while preserving character.
Practical Use Cases—and How to Prepare for Them
Make Sense shines where personality matters most. Here’s how it integrates across common workflows:
- Product packaging: Use it for flavor names, taglines, or ingredient highlights—not body copy. Print vendors often require outlined text or embedded fonts; export your final artwork with Make Sense converted to outlines before sending to press. Test print at 100% scale first—the subtle ink spread on kraft paper can soften fine strokes.
- Social media visuals: Pair Make Sense headlines with high-contrast backgrounds. On Instagram or Pinterest, legibility drops fast on mobile. Keep line length under 40 characters per line, and avoid stacking multiple script lines. Use it for one focal phrase only—never for captions or CTAs.
- Wedding stationery: It works beautifully for names and dates, but avoid using it for full invitation text. Instead, set the couple’s names in Make Sense and switch to a readable serif (like Lora or Merriweather) for details. This maintains hierarchy and ensures guests actually read the time and location.
- Branding projects: If your client values craft, community, or care—think bakeries, wellness studios, or indie publishers—Make Sense helps signal those values visually. But don’t lead with it in logo mockups unless the brand strategy explicitly calls for hand-drawn authenticity. Test it alongside secondary fonts early, not late.
Compatibility and Technical Readiness
Make Sense is available in OTF and TTF formats, compatible with all major design software and web platforms. For web use, convert it to WOFF2 via a trusted tool (like Font Squirrel’s generator) and host it locally—don’t rely on third-party CDNs for custom fonts. Web performance matters: limit usage to headings only, and always define fallbacks (font-family: "Make Sense", cursive;). Avoid loading it on every page; conditionally load it only where needed (e.g., landing pages or blog headers).
On mobile devices, test rendering across iOS and Android. Some older Android versions render custom scripts inconsistently. If responsiveness is critical, use CSS @supports to serve Make Sense only where supported—and fall back gracefully.
Workflow Integration Tips
You don’t need to overhaul your process to use Make Sense effectively. Start small:
- Identify one recurring asset—a newsletter header, product label template, or social post banner—and swap in Make Sense for the main headline. Track engagement or feedback for two weeks. Does it improve recognition? Does it align better with audience expectations?
- Create a style guide snippet that defines exactly how and where Make Sense appears: size ranges, color contrast minimums (aim for 4.5:1 against background), spacing rules (e.g., “always add 20% extra line-height”), and prohibited uses (no all-caps, no reversed-out text on busy photos).
- Batch your font management. Store Make Sense in a dedicated “handwritten” folder within your design system library. Name files clearly:
MakeSense-Regular.woff2,MakeSense-Bold.otf. Avoid duplicate versions—version control prevents accidental use of outdated weights.
Long-Term Use and Consistency
Fonts gain meaning through repetition. Using Make Sense selectively—across touchpoints like email headers, packaging seals, and workshop handouts—builds recognition over time. But consistency isn’t about uniformity; it’s about intentional variation. For example, use the regular weight for printed materials and the bold weight only for digital banners where screen resolution demands stronger presence.
Avoid overuse. Handwritten fonts fatigue readers faster than neutral ones. If you’re designing a 12-page lookbook, limit Make Sense to three key moments: cover title, section dividers, and closing quote. Let the rest breathe with supportive typefaces. This preserves its impact and keeps your work feeling curated—not cluttered.
Working With Others
When collaborating, share more than the font file. Include a brief usage note: “Make Sense is used only for primary headlines and never for body copy. Always pair with [X] sans-serif for balance.” If you’re handing off to a developer, provide CSS variables for font-weight mapping and a sample code block showing proper loading and fallback behavior.
For clients unfamiliar with typography, show side-by-side comparisons: one version using a generic script font, another using Make Sense—same layout, same colors. Point to specific details: the subtle tail on the lowercase g, the way the o and e connect naturally. Help them see it as a deliberate choice—not just “cute,” but communicative.
Quality Control in Practice
Before finalizing any asset with Make Sense, run these quick checks:
- Zoom to 200%: Do letters touch or bleed unintentionally? Adjust tracking if needed—especially in all-uppercase settings.
- Print a physical proof: Screen rendering hides subtle spacing issues. What looks balanced on Retina display may feel cramped on uncoated stock.
- Test readability with someone outside your team: Ask them to read the Make Sense text aloud. If they hesitate, stumble, or misread a word, simplify—reduce flourishes or increase size.
- Verify licensing: Make Sense is licensed for commercial use, but check whether your intended use (e.g., embedding in an app or SaaS dashboard) requires an extended license. When in doubt, contact the foundry directly—clarity here prevents legal friction later.
Making It Last
Like any tool, Make Sense gains value the more thoughtfully you apply it. It won’t solve vague branding goals—but it will reinforce clear ones. It won’t compensate for weak messaging—but it will elevate strong, human-centered writing. Use it when you want people to pause, smile, and remember—not just scan and scroll.
Start by asking: *What do I want this piece to feel like—not just look like?* If the answer includes words like “warm,” “inviting,” “thoughtful,” or “crafted,” Make Sense is likely the right fit. Then, integrate it deliberately: test, document, refine, repeat. Not as decoration—but as part of your workflow’s quiet infrastructure: reliable, expressive, and quietly confident.